
Krsna Kirtana Songs
est. 2001 www.kksongs.org
Home
à Music Center à Instrumental Guides à Harmonium Guide
Chapter 06: Sargam:
The Indian Solfege
According to the Srimad Bhagavatam, Lord Brahma, by the order of Lord Krsna, created the material planet. He also created the
first sound wave. The sound wave is the mantra “om.” Om is the single syllable that is used to address to the
Supreme Personality of Godhead. Meditation and recitations took place with
three swars
or notes. This ancient tritonal system expanded by
Brahma’s creation to seven notes which replicate the
seven sounds of the nature. The seven sounds of nature are sadaja, rsabha, gandhara, madhyama,
pancama, dhaivata and nisada.
These notes are commonly called sa, r, ga, ma, pa, dha
and ni. “Sadaja” or
“sa” is the most important note because from sa, the other notes can be formed.
In fact, sadaja is the Sanskrit word for “origin of
the six.” The six notes describe the distance from the main sa.
These notes are indeed defined by nature. Sa
describes the sound of the peacock, r describes the sound of a bull. The goats
sound is described by ga, and the dove is shown by
ma. Pa has the sound of a cuckoo. Dha has the sound
of the horse and ni has the sound of the elephant.
Music has always used these seven swars. These seven swars are
called the saptak
or seven notes. It is also called a sargam. The sargam or saptak has been used by voice, but also in string
instruments, and wind instruments. Recall from the previous chapter how we
dealt with fundamental unit that repeats throughout the harmonium. That
fundamental unit consists of seven keys that are white. These seven white keys
represent the sargam in order. Keep in mind that the
harmonium was designed to keep the natural notes on white keys. This is the
reason why the white keys are called “natural keys.” Look at figure 6.1. This
shows the natural keys in order.

Figure 6.1
Play these keys to the upward direction. Remember
that after ni, a new saptak
starts with sa. Then play in the downward direction
to sa. Listen carefully between both notes.
Did you notice that between some notes, there are
some hidden tones. Technically, between every two consecutive notes, there are
infinite numbers of semitones. However, within the sargam,
there are five semitones between the natural notes that are very distinct.
These notes are between sa and re, re and ga, ma and pa, pa and dha, and dha and ni. The note between sa and re is called komal re. The
note between re and ga is known as komal ga. The note
between pa and dha is called komal dha, and the the
note between dha and ni is
called komal ni. The note
between ma and pa, however, is called tivra ma. Komal means “flat” and tivra
means “sharp.” The reason why ma is allowed to be sharpened is a very
complicated reason which can be found in a details classical musical book.
These five altered notes are known as vikrta swars. These
five vikrta swars are
represented by the black keys. The seven white natural notes are known as suddha swars. The
notes are in the following order:
Sa, komal re, re, komal ga, ga,
ma, tivra ma, pa, komal dha, dha, komal
ni, ni.
A faster way to write these notes is very simple.
All suddha notes except
ma are capitalized. For example, suddha ga is written with a capital G. In the case of suddha ma, that is written as an undercase
m. Tivra ma is written with a capital M. Sa and pa
are always capitalized.
The entire sargam is
written as the following:
S r R g G m M P d D
n N Play this in ascending and descending order. Look
at Figure 6.2 to help you out.

Figure 6.2
This is assumed to be in the madhya-saptak.
If we were to expand to the tar-saptak, we use an
apostrophe after the note. Similarly, the mandra-saptak
notes have an apostrophe before the note.
Here is a keyboarded diagram of all we have learned
so far in this guide. This is containing the suddha swars, vikrta swars,
the repeating keyboard sequence, the three ranges of saptaks
and how to write the swars.
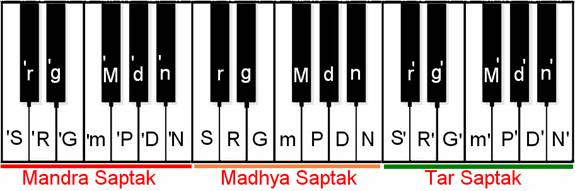
Figure 6.3
Let’s look at an example sargam.
Raga Sri:
Ascending: S r M P N S’ r’ S’
Descending: r’ N d P M P d M P r G r S ‘N S
This raga will be taught later on. However, do play
this on the harmonium. Look at the keys on Figure 6.3 to help you. A very
useful hint to play these notes is not to play the keys with the index fingers
alone. Use the index, thumb, and middle fingers to help you play. Do get
familiar on how to play the natural notes without looking. Try these exercises.
S
S R S
S R G R S
S R G m G R S
S R G m P m G R S
S R G m P D P m G R S
‘N S R G m P D P m G R ‘N S
‘N ‘D ‘ P ‘D ‘P ‘M ‘P
‘P ‘N S G R G
S
Practice these exercises very frequently to get used
to know the locations of the sargam. Remember to use
the diagram of Figure 6.3!
Even though we learned notes, the notes without a
proper link or order are without meaning. The next two chapters will deal with
very important concepts of developing melodies.
Before moving onto the next chapter, I suggest you
cut copy the keyboard on Figure 6.3 and cut the swars
out. Take these little squares and place them on the appropriate keys on your
harmonium’s keyboards. Think of these as training wheels. Once you practice
enough and get the hang of it, you can take these off, as you will already know
where notes are located.
UPDATED: June 18, 2009